Miagui: Difference between revisions
Jump to navigation
Jump to search
imported>Scott No edit summary |
imported>Scott No edit summary |
||
| Line 15: | Line 15: | ||
# Export your images to [[Analysis GUI|Analysis]] or [[Texture_GUI | Texture]] for further exploration. | # Export your images to [[Analysis GUI|Analysis]] or [[Texture_GUI | Texture]] for further exploration. | ||
==Settings== | |||
*'''Display Aggregation Mode''' - If an image not gray-scale or RGB, the "display" image (the image shown in the figure) is calculated as one of theses options (mean, median, range, or STD). | |||
*'''Image Concatenation Mode''' - When you concatenate a group of images this option indicates whether to remove the concat group or not. | |||
*'''Colormap''' - Color map for the display. | |||
*'''Crop Settings''' - Settings applied when cropping. | |||
**'''Crop Tool''' - Selection tool used when cropping. | |||
**'''Crop Style''' - Crop or cut (include or exclude) selection. | |||
**'''Exclusion On Crop''' - When dealing with irregular crop shape, remaining "cropped" area will be marked as excluded (in the DSO) by default. | |||
**'''Set Outside Crop to NaN''' - When dealing with irregular crop shape, remaining "cropped" area will be set to NaN by default. | |||
**'''Group Crop Mode''' - When applying crop area to group, area is located using this setting. | |||
Revision as of 20:53, 28 October 2009
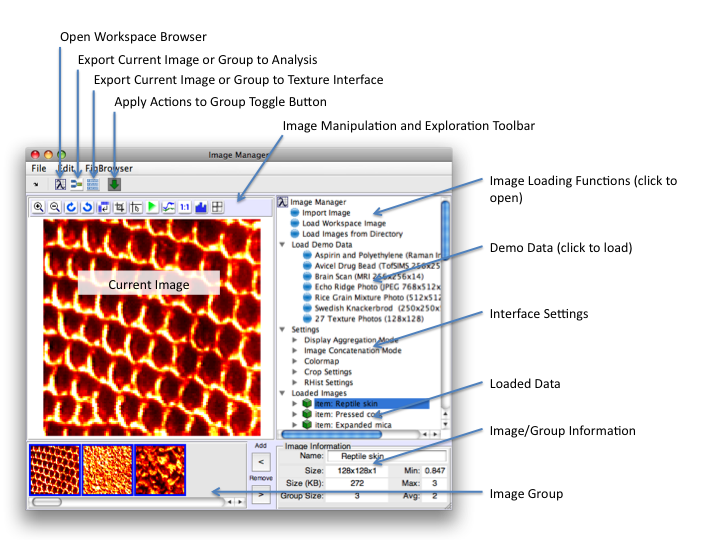
The Image Manager provides a place to load, organize, explore, and manipulate images before further analysis with Eigenvector tools.
Opening Image Manager
The Image Manager interface can be started from the Workspace Browser (when using Solo or PLS_Toolbox) or from the command line using the command miagui.
- >> miagui
It can also be started by clicking on the Image Manager icon in the Workspace Browser
Work Flow
- Load data by clicking on one of the Image Loading leafs [in the Image Manger tree] or by clicking on one of the demo data leafs.
- If you're working with a group of images, add them to your group with the buttons or double-click the data leaf in the Loaded Images branch of the tree.
- Use the Image Toolbar to manipulate and explore you image. NOTE: the "Apply To Group" toggle button is "on" by default, this will apply any appropriate action to your image group when using the Image Toolbar.
- Export your images to Analysis or Texture for further exploration.
Settings
- Display Aggregation Mode - If an image not gray-scale or RGB, the "display" image (the image shown in the figure) is calculated as one of theses options (mean, median, range, or STD).
- Image Concatenation Mode - When you concatenate a group of images this option indicates whether to remove the concat group or not.
- Colormap - Color map for the display.
- Crop Settings - Settings applied when cropping.
- Crop Tool - Selection tool used when cropping.
- Crop Style - Crop or cut (include or exclude) selection.
- Exclusion On Crop - When dealing with irregular crop shape, remaining "cropped" area will be marked as excluded (in the DSO) by default.
- Set Outside Crop to NaN - When dealing with irregular crop shape, remaining "cropped" area will be set to NaN by default.
- Group Crop Mode - When applying crop area to group, area is located using this setting.
