Model Building: Calibration Phase: Difference between revisions
imported>Jeremy No edit summary |
No edit summary |
||
| (4 intermediate revisions by one other user not shown) | |||
| Line 1: | Line 1: | ||
__TOC__ | __TOC__ | ||
[[TableOfContents|Table of Contents]] | [[ModelBuilding_AnalysisPhasesOverview|Previous]] | [[ModelBuilding_PlottingEigenValues|Next]] | [[TableOfContents|Table of Contents]] | [[ModelBuilding_AnalysisPhasesOverview|Previous]] | [[ModelBuilding_PlottingEigenValues|Next]] | ||
| Line 8: | Line 9: | ||
{| | {| | ||
|- | |- valign="top" | ||
|1. | |1. | ||
| Line 18: | Line 19: | ||
{| | {| | ||
|- | |- valign="top" | ||
|2. | |2. | ||
| Line 28: | Line 29: | ||
{| | {| | ||
|- | |- valign="top" | ||
|3. | |3. | ||
| Line 38: | Line 39: | ||
{| | {| | ||
|- | |- valign="top" | ||
|4. | |4. | ||
| Line 48: | Line 49: | ||
{| style="margin-left:18pt" | {| style="margin-left:18pt" | ||
|- | |- valign="top" | ||
| | | | ||
| Line 57: | Line 58: | ||
{| style="margin-left:18pt" | {| style="margin-left:18pt" | ||
|- | |- valign="top" | ||
| | | | ||
| Line 64: | Line 65: | ||
|} | |} | ||
Note: Decomposition and Clustering analysis methods require only x block data for model building in the Calibration phase. Regression analysis methods require both x block data and y block data. Classification analysis methods require x block data with classes in either X or Y. For simplicity and brevity, this section describes model building during the Calibration phase using default preprocessing methods for a simple PCA model; however, all of the general information in this section is applicable for all analysis methods. | '''Note:''' Decomposition and Clustering analysis methods require only x block data for model building in the Calibration phase. Regression analysis methods require both x block data and y block data. Classification analysis methods require x block data with classes in either X or Y. For simplicity and brevity, this section describes model building during the Calibration phase using default preprocessing methods for a simple PCA model; however, all of the general information in this section is applicable for all analysis methods. | ||
Note: Although this section describes model building using default preprocessing methods, remember, for most analyses, it is critical to select the appropriate preprocessing methods for the data that is being analyzed. To review detailed information about preprocessing, see [[ModelBuilding_PreProcessingMethods|Preprocessing Methods]]. | '''Note:''' Although this section describes model building using default preprocessing methods, remember, for most analyses, it is critical to select the appropriate preprocessing methods for the data that is being analyzed. To review detailed information about preprocessing, see [[ModelBuilding_PreProcessingMethods|Preprocessing Methods]]. | ||
Note: To review a detailed description of the Calibration phase, see [[ModelBuilding_AnalysisPhasesOverview| | '''Note:''' To review a detailed description of the Calibration phase, see [[ModelBuilding_AnalysisPhasesOverview| "Analysis Phases."]] | ||
===Loading the calibration data and building the initial model=== | ===Loading the calibration data and building the initial model=== | ||
| Line 76: | Line 77: | ||
{| | {| | ||
|- | |- valign="top" | ||
| | | | ||
| Line 85: | Line 86: | ||
{| style="margin-left:18pt" | {| style="margin-left:18pt" | ||
|- | |- valign="top" | ||
| | | | ||
| Line 94: | Line 95: | ||
{| style="margin-left:18pt" | {| style="margin-left:18pt" | ||
|- | |- valign="top" | ||
| | | | ||
| Line 103: | Line 104: | ||
{| style="margin-left:18pt" | {| style="margin-left:18pt" | ||
|- | |- valign="top" | ||
| | | | ||
| Line 110: | Line 111: | ||
|} | |} | ||
:Note: For information about working with icons in the Workspace Browser, see [[WorkspaceBrowser_DataIcons|Icons in the Workspace Browser]]. | :'''Note:''' For information about working with icons in the Workspace Browser, see [[WorkspaceBrowser_DataIcons|Icons in the Workspace Browser]]. | ||
{| | {| | ||
|- | |- valign="top" | ||
| | | | ||
| Line 123: | Line 124: | ||
{| style="margin-left:18pt" | {| style="margin-left:18pt" | ||
|- | |- valign="top" | ||
| | | | ||
| Line 132: | Line 133: | ||
{| style="margin-left:18pt" | {| style="margin-left:18pt" | ||
|- | |- valign="top" | ||
| | | | ||
| Line 141: | Line 142: | ||
{| style="margin-left:18pt" | {| style="margin-left:18pt" | ||
|- | |- valign="top" | ||
| | | | ||
| Line 150: | Line 151: | ||
{| style="margin-left:18pt" | {| style="margin-left:18pt" | ||
|- | |- valign="top" | ||
| | | | ||
| Line 157: | Line 158: | ||
|} | |} | ||
:Note: For information about the data manipulation options on the context menu, see [[WorkspaceBrowser_DataIcons|Icons in the Workspace Browser]] or [[WorkspaceBrowser_ImportingData|Importing Data into the Workspace Browser]]. For information about loading items from the Model Cache pane, see [[AnalysisWindow_ModelCachepane|Analysis window Model Cache pane]]. | :'''Note:''' For information about the data manipulation options on the context menu, see [[WorkspaceBrowser_DataIcons|Icons in the Workspace Browser]] or [[WorkspaceBrowser_ImportingData|Importing Data into the Workspace Browser]]. For information about loading items from the Model Cache pane, see [[AnalysisWindow_ModelCachepane|Analysis window Model Cache pane]]. | ||
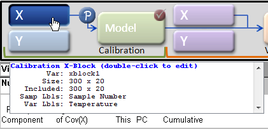
Also, remember that after you load data into a calibration control, you can place your mouse pointer on the control to view not only information about the loaded data, but also, different instructions about working with the control. In the figure below, data has been loaded into the X calibration control for a PCA analysis. | Also, remember that after you load data into a calibration control, you can place your mouse pointer on the control to view not only information about the loaded data, but also, different instructions about working with the control. In the figure below, data has been loaded into the X calibration control for a PCA analysis. | ||
:''Example of loaded data in the X calibration control for a PCA analysis'' | |||
::[[Image:PCA_analysis_xblock_data_loaded_Cal.png|269x129px]] | ::[[Image:PCA_analysis_xblock_data_loaded_Cal.png|269x129px]] | ||
| Line 173: | Line 174: | ||
{| | {| | ||
|- | |- valign="top" | ||
| | | | ||
| Line 182: | Line 183: | ||
{| | {| | ||
|- | |- valign="top" | ||
| | | | ||
| Line 189: | Line 190: | ||
|} | |} | ||
:''Clicking the Model control in the Analysis window'' | |||
:: | :: | ||
| Line 199: | Line 200: | ||
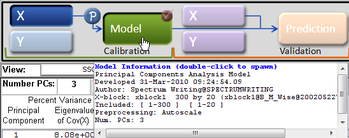
After the initial model is calculated, you can place your mouse pointer on the Model control to view general information about the model. To view detailed information the model, right-click on the Model control and on the context menu that opens, select Show Model Details. | After the initial model is calculated, you can place your mouse pointer on the Model control to view general information about the model. To view detailed information the model, right-click on the Model control and on the context menu that opens, select Show Model Details. | ||
:''Showing model details in the Analysis window'' | |||
::[[Image:Information_initial_model.png|350x138px]] | ::[[Image:Information_initial_model.png|350x138px]] | ||
| Line 216: | Line 217: | ||
{| | {| | ||
|- | |- valign="top" | ||
|1. | |1. | ||
| Line 226: | Line 227: | ||
{| | {| | ||
|- | |- valign="top" | ||
|2. | |2. | ||
| Line 236: | Line 237: | ||
{| style="margin-left:18pt" | {| style="margin-left:18pt" | ||
|- | |- valign="top" | ||
| | | | ||
| Line 245: | Line 246: | ||
{| style="margin-left:18pt" | {| style="margin-left:18pt" | ||
|- | |- valign="top" | ||
| | | | ||
| Line 252: | Line 253: | ||
|} | |} | ||
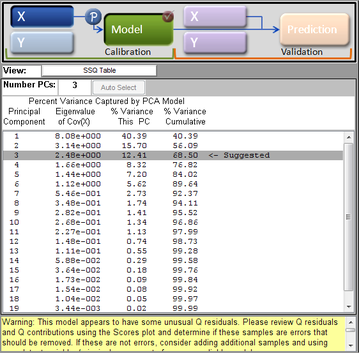
Note: By default, the maximum number of principal components or factors that you can retain in a model is 20. You can change this value in the Analysis options settings for the Edit menu. For example, the figure below shows an initial model calculated for a PCA analysis with the suggested value for the number of components to retain set to three. | '''Note:''' By default, the maximum number of principal components or factors that you can retain in a model is 20. You can change this value in the Analysis options settings for the Edit menu. For example, the figure below shows an initial model calculated for a PCA analysis with the suggested value for the number of components to retain set to three. | ||
:''Initial model calculated for a PCA analysis with number of suggested components = 3'' | |||
::[[Image:Control_pane_PCA.png|359x353px]] | ::[[Image:Control_pane_PCA.png|359x353px]] | ||
| Line 261: | Line 262: | ||
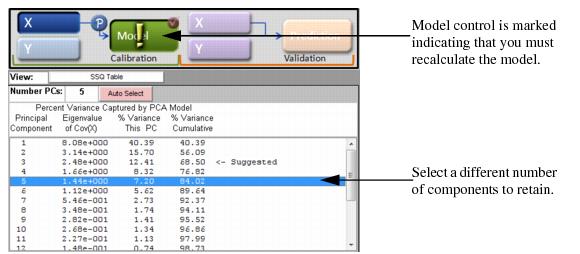
After you select a different number of components or factors to retain, the Model control is marked with an Exclamation icon indicating that you must recalculate the model. | After you select a different number of components or factors to retain, the Model control is marked with an Exclamation icon indicating that you must recalculate the model. | ||
:''Model marked for recalculation'' | |||
::[[Image:ModelBuilding_CalibrationPhase.23.1.07.jpg|580x254px]] | ::[[Image:ModelBuilding_CalibrationPhase.23.1.07.jpg|580x254px]] | ||
| Line 273: | Line 274: | ||
After the model is calculated, the Control pane displays the percent variance captured and other statistical information for the model. For certain analyses, the application provides a suggested number of components or factors to retain for the model based on internal tests. For example, the figure below shows an initial model calculated for a PCA analysis with the suggested value for the number of components to retain set to three. | After the model is calculated, the Control pane displays the percent variance captured and other statistical information for the model. For certain analyses, the application provides a suggested number of components or factors to retain for the model based on internal tests. For example, the figure below shows an initial model calculated for a PCA analysis with the suggested value for the number of components to retain set to three. | ||
:''Initial model calculated for a PCA analysis with number of suggested components = 3'' | |||
::[[Image:Control_pane_PCA.png|359x353px]] | ::[[Image:Control_pane_PCA.png|359x353px]] | ||
| Line 282: | Line 283: | ||
{| | {| | ||
|- | |- valign="top" | ||
| | | | ||
| Line 291: | Line 292: | ||
{| | {| | ||
|- | |- valign="top" | ||
| | | | ||
| Line 300: | Line 301: | ||
{| | {| | ||
|- | |- valign="top" | ||
| | | | ||
| Line 307: | Line 308: | ||
|} | |} | ||
Note: All other Analysis window toolbar buttons are specific to an analysis method and therefore, are not discussed in this guide. | {| | ||
|- valign="top" | |||
| | |||
* The Scores and loadings biplots button [[Image:Biplot_button.png|35x34px]]. See [[ModelBuilding_Biplot|Scores and Loadings Biplots for a Calibration Model]]. | |||
|} | |||
'''Note:''' All other Analysis window toolbar buttons are specific to an analysis method and therefore, are not discussed in this guide. | |||
:: | :: | ||
Latest revision as of 09:58, 13 February 2020
Table of Contents | Previous | Next
Building the Model in the Calibration Phase
Regardless of the analysis method, building a model in the Calibration phase consists of a series of the same general steps, with the second and third steps being iterative, until you are satisfied with your model. These steps are:
| 1. | Loading the calibration data and building the initial model. See Loading the calibration data and building the initial model. |
| 2. | Changing the number of components or factors that are to be retained in the model and recalculating the model. See Changing the number of components. |
| 3. | Examining the model and refining the model by excluding certain samples and/or variables to enhance the model performance. See Examining and refining the model. |
| 4. | After you are satisfied with the model, you can then do one of the following: |
|
|
Note: Decomposition and Clustering analysis methods require only x block data for model building in the Calibration phase. Regression analysis methods require both x block data and y block data. Classification analysis methods require x block data with classes in either X or Y. For simplicity and brevity, this section describes model building during the Calibration phase using default preprocessing methods for a simple PCA model; however, all of the general information in this section is applicable for all analysis methods.
Note: Although this section describes model building using default preprocessing methods, remember, for most analyses, it is critical to select the appropriate preprocessing methods for the data that is being analyzed. To review detailed information about preprocessing, see Preprocessing Methods.
Note: To review a detailed description of the Calibration phase, see "Analysis Phases."
Loading the calibration data and building the initial model
You have a variety of options for opening an Analysis window and loading data. Because these methods have been discussed in detail in other areas of the documentation, they are not repeated here. Instead, a brief summary is provided with a cross-reference to the detailed information. Simply choose the method that best fits your working needs.
|
|
|
|
- Note: For information about working with icons in the Workspace Browser, see Icons in the Workspace Browser.
|
|
|
|
|
- Note: For information about the data manipulation options on the context menu, see Icons in the Workspace Browser or Importing Data into the Workspace Browser. For information about loading items from the Model Cache pane, see Analysis window Model Cache pane.
Also, remember that after you load data into a calibration control, you can place your mouse pointer on the control to view not only information about the loaded data, but also, different instructions about working with the control. In the figure below, data has been loaded into the X calibration control for a PCA analysis.
- Example of loaded data in the X calibration control for a PCA analysis
After you have opened the Analysis window and loaded the calibration data, you then calculate the initial model. To calculate the initial calibration model, you can do one of the following:
|
- Clicking the Model control in the Analysis window
After the initial model is calculated, you can place your mouse pointer on the Model control to view general information about the model. To view detailed information the model, right-click on the Model control and on the context menu that opens, select Show Model Details.
- Showing model details in the Analysis window
Changing the number of components
For analysis methods which use factors or principal components, you can choose a different number of components or factors to retain in the model and then recalculate the model. To choose a different number of components or factors:
| 1. | Click on the appropriate row in the Control panel. |
| 2. | Recalculate the model by doing one of the following: |
|
Note: By default, the maximum number of principal components or factors that you can retain in a model is 20. You can change this value in the Analysis options settings for the Edit menu. For example, the figure below shows an initial model calculated for a PCA analysis with the suggested value for the number of components to retain set to three.
- Initial model calculated for a PCA analysis with number of suggested components = 3
After you select a different number of components or factors to retain, the Model control is marked with an Exclamation icon indicating that you must recalculate the model.
- Model marked for recalculation
Examining and refining the model
After the model is calculated, the Control pane displays the percent variance captured and other statistical information for the model. For certain analyses, the application provides a suggested number of components or factors to retain for the model based on internal tests. For example, the figure below shows an initial model calculated for a PCA analysis with the suggested value for the number of components to retain set to three.
- Initial model calculated for a PCA analysis with number of suggested components = 3
The Analysis window toolbar is updated dynamically with other toolbar buttons based on the selected analysis method. All of these toolbar buttons create plots and other visual aids that assist you in examining and refining the model by excluding certain samples and/or variables to enhance the model performance. Common toolbar buttons include the following:
|
|
|
|
Note: All other Analysis window toolbar buttons are specific to an analysis method and therefore, are not discussed in this guide.


