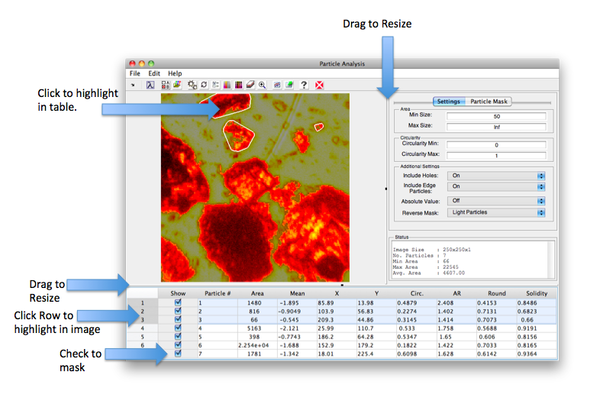
Particle Analysis Window
The Particle Analysis window is an interface into the analyzeparticles function. Included in the interface are controls for adjusting settings for the particle analysis and exploring the results. Once the particle analysis is complete you can export the resulting image and or table to analysis. When an image is exported to analysis, the particles identified by Particle Analysis are identified in class-sets associated with each particle. One classset has a class for each particle. Pixels within particle j have class = j. Non particle pixels have class = 0. Second classset has one class for all particles. Pixels within any particle have class = 1. Non particle pixels have class = 0.
Interface
The Particle Analysis interface has three main areas for the image, particle table, and analysis function settings. The basic workflow:
- Load image data (via the File menu).
- Adjust function settings.
- Adjust threshold mask and preprocessing.
- Run the particle analysis (see Toolbar).
- Explore the results.
- Repeat steps 2-5 until you have the desired results.
- Save or export your results.
Menu
- File
- Load Workspace Image - Load image data (numeric or DataSet) from the Workspace.
- Import Image - Load an image from a supported file format.
- Load Model - Load a previously saved particle model.
- Save Image - Save image to file or workspace.
- Save Table Data - Save particle table data to file or workspace.
- Save Model - Save particle model (includes table).
- Clear
- Clear Data
- Clear Model
- Clear Preprocessing
- Clear all
- Close - Close Particle Analysis window without saving data.
- Edit
- Interface Options - Optional settings for Particle Analysis interface.
- Particle Analysis Options - Optional settings for the Particle Analysis function. Note that most of these settings are available in the Settings area of the window.
- Help
- Particle Analysis Help - Opens this page.
- PLS_Toolbox Help - Opens main help page for PLS_Toolbox.
Toolbar
From left to right in the image above the toolbar buttons are:
- Lambda - Opens the Workspace Browser.
- Options - Open function options.
- Import - Open image import dialog.
- Gears - Runs particle analysis using the current settings.
- Reset - Reset analysis settings to default values.
- Check Box - Toggles all the selected particles.
- Grayscale - Toggle image from color to grayscale.
- Binary - Toggle alpha mask of binary image (overlay onto image).
- Layers - Changes the background alpha color of the particles. Cycles through Black, White, and Red and can be used to enhance appearance of particles.
- Zoom - Toggle zoom on and off.
- Table Export - Export the particle table to analysis.
- Plot - Open image in plotgui.
- Help - Open help window for interface.
- X - Close the window without saving.
Settings
For a detailed explanation of the function setting see analyzeparticles. Additional settings can be found using Edit>Particle Analysis Options (or clicking the Options toolbar button).
Image
Depending on the settings, the image displays particles as regions masked with a semitransparent layer either over each particle or over the non-particle region. The background color on the transparent portions can be adjusted to emphasize the regions by using the Layers toolbar button. Clicking on a particle will highlight the particle's row in the the particle table and draw an outline around the particle.
Particle Table
The Particle Table has two particle selection methods to help identify particles in the image. First, you can check/uncheck the checkboxes in the Show column. When checked, the corresponding particle is highlighted in the image by dimming all non-particle pixels. You can also select one or more rows by clicking on the row number on left edge of table. This will draw an outline around the particle (see image above).
Note that the results table shows particle characteristics with dimensional quantities such as Perimiter or Area reported in pixels or in imageaxisscale units. Image Axisscale units are used if the image dataset has imageaxisscales for both x and y dimensions. If only one imageaxisscale is present then its units are used for both x and y dimensions. If there are no imageaxisscales present then units are pixels.
