Diviner preprocess: Difference between revisions
No edit summary |
No edit summary |
||
| (14 intermediate revisions by the same user not shown) | |||
| Line 18: | Line 18: | ||
</gallery> | </gallery> | ||
===X-block Recipes Table=== | |||
'''This | The X-block recipes table has three columns. The first column shows the preprocessing recipes to be used. The second column has a check box indicating if the recipe should be included in the Diviner run. The third column has a check box indicating if the recipe should be used for outlier detection. The outlier detection recipes will be used if the Outlier Detection setting is set to On. See this wiki page for more information on outlier detection: [[diviner_review_outliers | Diviner outlier detection]] | ||
===Y-block Recipes Table=== | |||
The Y-block recipe table only has the first column, showing the preprocessing recipes to be used for the Y-block data and the second column, indicating if the recipe should be included. | |||
==Custom Libraries== | |||
===Creating Custom Libraries=== | |||
There are two ways to create a custom preprocessing library: | |||
====From a Pre-set Library==== | |||
* Choose a pre-set library | |||
* In the '''Recipes''' section click on the '''Add recipe''' button, or | |||
* Select a recipe in the recipe table to remove and click on the '''Remove selected recipe''' button | |||
* If adding a recipe, in the [[Model_Building:_Preprocessing_Methods#Preprocessing_Window | Preprocessing window]] create the recipe to add and select OK | |||
* This will create a '''New Library''' in the Custom Library section that will be a copy of the pre-set library but will contain the added recipe or will not contain the recipe chosen for removal | |||
<gallery widths=500px heights=500px mode="nolines"> | |||
File: Diviner_Preprocessing_Add_Recipe.png | |||
File: Diviner_Preprocessing_Remove_recipe.png | |||
</gallery> | |||
*'''Note:''' These steps will also work to create a new custom library from an existing custom library | |||
====From an Empty Library==== | |||
* Select the '''Pre-set Library''' item or the '''Custom Library''' item | |||
* In the '''Recipes''' section click on the '''Add recipe''' button | |||
* In the [[Model_Building:_Preprocessing_Methods#Preprocessing_Window | Preprocessing window]] create the recipe to add and select OK | |||
* This will create a '''New Library''' in the Custom Library section that will contain the added recipe. | |||
* '''Note:''' A preprocessing recipe of '''None''' will be automatically added to both the X recipe table and the Y recipe table | |||
<gallery widths=500px heights=500px mode="nolines"> | |||
File: Diviner_Preprocessing_Custom_Library_Add.png | |||
File: Diviner_Preprocessing_New_Library.png | |||
</gallery> | |||
===Save a Custom Library=== | |||
Use the '''Save''' button to save a custom preprocessing library. An asterisk ('''*''') indicates a change has been made and the preprocessing library needs to be saved. | |||
===Edit a Custom Library=== | |||
Use the '''Edit Mode''' check box to edit a custom preprocessing library. This allows adding or removing recipes and changing the library name. If the '''Edit Mode''' box is not checked then this will behave the same as creating a new library from a pre-set library. | |||
===Import and Export Custom Library=== | |||
Use the File → Import Library menu item to import a custom library. | |||
Use the File → Export Library menu item to export a custom library. This menu it is disabled when the currently selected library is a pre-set library. | |||
===User Comments=== | |||
Use the File → User Comments menu item to add comments to a custom library. This menu it is disabled when the currently selected library is a pre-set library. | |||
==Plot Preprocessed Data== | |||
To plot preprocessed data: | |||
* Select the recipe of interest | |||
* Click the '''Plot preprocessed data''' button | |||
* The resulting plot will be automatically colored by a property of interest. Use the '''Color By''' drop down list to change the property that will be used to color by in the plot | |||
<gallery widths=500px heights=600px mode="nolines"> | |||
File: Preprocessing_Window_Plot_Data.png | |||
File: Preprocessing_Window_Color_By.png | |||
</gallery> | |||
Latest revision as of 15:42, 27 January 2025
Diviner Preprocessing Settings Window
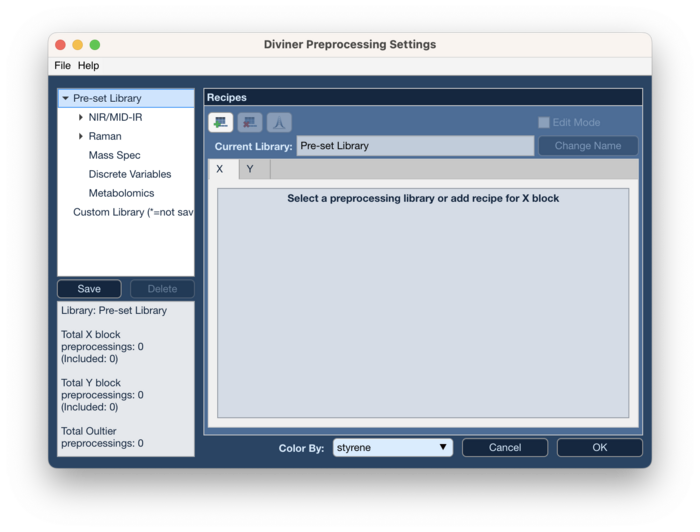
The Diviner preprocessing settings window allows choosing or creating the preprocessing library to be used by Diviner. A preprocessing library consists of one or more preprocessing recipes. A preprocessing recipes contains one or more preprocessing methods. See this wiki page for more on preprocessing methods: preprocessing methods
Pre-set Libraries
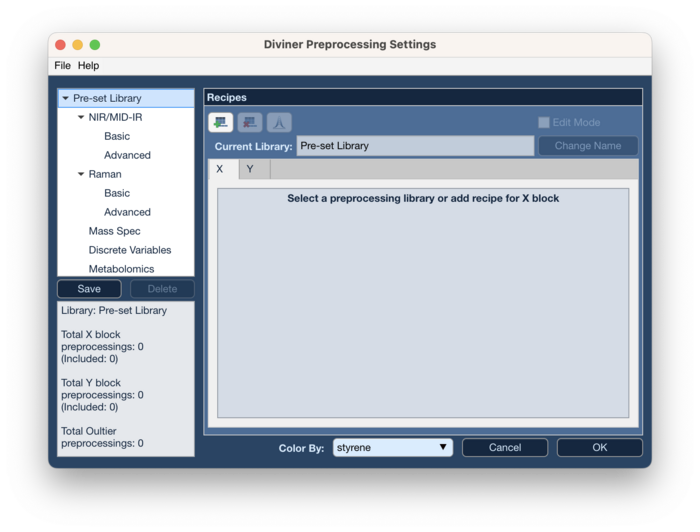
The Diviner Preprocessing window has five pre-set libraries to choose from based on the type of data. The NIR/MID-IR and Raman libraries both have a Basic library and an Advanced library.
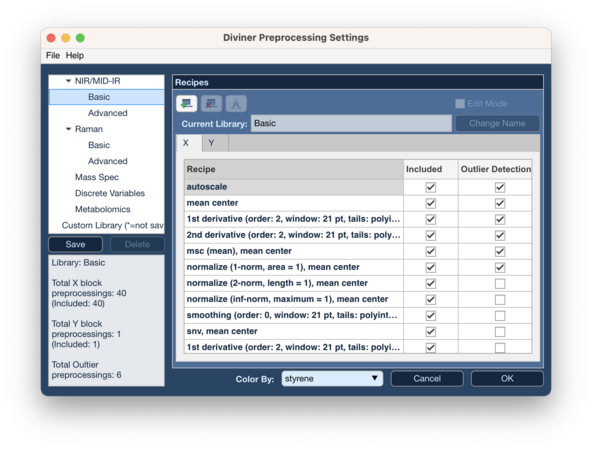
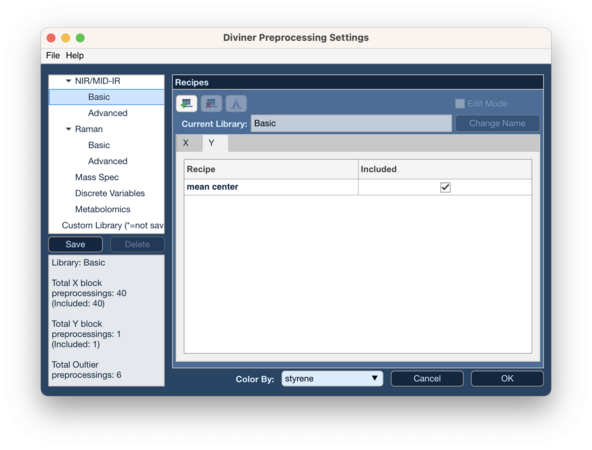
Choosing a library will show a table of the recipes in the Recipes section. The Recipes section has two tabs: one for the X-block preprocessing recipes and one for the Y-block preprocessing recipes.
X-block Recipes Table
The X-block recipes table has three columns. The first column shows the preprocessing recipes to be used. The second column has a check box indicating if the recipe should be included in the Diviner run. The third column has a check box indicating if the recipe should be used for outlier detection. The outlier detection recipes will be used if the Outlier Detection setting is set to On. See this wiki page for more information on outlier detection: Diviner outlier detection
Y-block Recipes Table
The Y-block recipe table only has the first column, showing the preprocessing recipes to be used for the Y-block data and the second column, indicating if the recipe should be included.
Custom Libraries
Creating Custom Libraries
There are two ways to create a custom preprocessing library:
From a Pre-set Library
- Choose a pre-set library
- In the Recipes section click on the Add recipe button, or
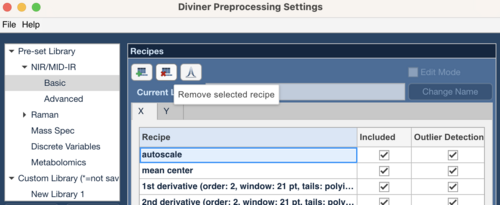
- Select a recipe in the recipe table to remove and click on the Remove selected recipe button
- If adding a recipe, in the Preprocessing window create the recipe to add and select OK
- This will create a New Library in the Custom Library section that will be a copy of the pre-set library but will contain the added recipe or will not contain the recipe chosen for removal
- Note: These steps will also work to create a new custom library from an existing custom library
From an Empty Library
- Select the Pre-set Library item or the Custom Library item
- In the Recipes section click on the Add recipe button
- In the Preprocessing window create the recipe to add and select OK
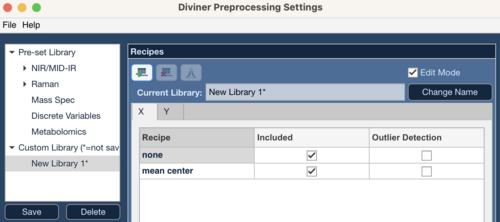
- This will create a New Library in the Custom Library section that will contain the added recipe.
- Note: A preprocessing recipe of None will be automatically added to both the X recipe table and the Y recipe table
Save a Custom Library
Use the Save button to save a custom preprocessing library. An asterisk (*) indicates a change has been made and the preprocessing library needs to be saved.
Edit a Custom Library
Use the Edit Mode check box to edit a custom preprocessing library. This allows adding or removing recipes and changing the library name. If the Edit Mode box is not checked then this will behave the same as creating a new library from a pre-set library.
Import and Export Custom Library
Use the File → Import Library menu item to import a custom library.
Use the File → Export Library menu item to export a custom library. This menu it is disabled when the currently selected library is a pre-set library.
User Comments
Use the File → User Comments menu item to add comments to a custom library. This menu it is disabled when the currently selected library is a pre-set library.
Plot Preprocessed Data
To plot preprocessed data:
- Select the recipe of interest
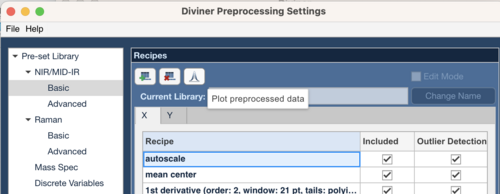
- Click the Plot preprocessed data button
- The resulting plot will be automatically colored by a property of interest. Use the Color By drop down list to change the property that will be used to color by in the plot
