Diviner analysis: Difference between revisions
No edit summary |
|||
| (23 intermediate revisions by the same user not shown) | |||
| Line 45: | Line 45: | ||
File:Load_Val_X_and_Y_Context_Menu.png | File:Load_Val_X_and_Y_Context_Menu.png | ||
</gallery> | </gallery> | ||
=====Validation Data===== | |||
'''Important Note:''' It is recommended to load validation data, if available, before performing a Diviner run. Doing so will apply all the models to the validation data and report RMSEP values in the Diviner results. If validation data is loaded afterwards then the Diviner run will need to be recalculated to apply the models to the test data. | |||
====Select Calibration Y Column==== | ====Select Calibration Y Column==== | ||
| Line 63: | Line 67: | ||
</gallery> | </gallery> | ||
===Set Preprocessing Recipes=== | |||
Once data has been loaded, the next step is to set the Preprocessing recipes to be used by Diviner to build the models. Click on the Preprocessing button to open the Diviner Preprocessing window. Please see this page for more information about the Diviner Preprocessing interface: [[Diviner_preprocess | diviner preprocessing interface]]. The collection of recipes will be referred to as a library. | Once data has been loaded, the next step is to set the Preprocessing recipes to be used by Diviner to build the models. Click on the Preprocessing button to open the Diviner Preprocessing window. Please see this page for more information about the Diviner Preprocessing interface: [[Diviner_preprocess | diviner preprocessing interface]]. The collection of recipes will be referred to as a library. | ||
| Line 71: | Line 75: | ||
Review and modify the cross-validation settings using the Cross-Validation button. Please this page for more information on using cross-validation: [[Using_Cross-Validation | cross-validation]]. The default is set to Venetian Blinds with 5 splits. | Review and modify the cross-validation settings using the Cross-Validation button. Please this page for more information on using cross-validation: [[Using_Cross-Validation | cross-validation]]. The default is set to Venetian Blinds with 5 splits. | ||
===Outlier Detection=== | |||
If the preprocessing library contains recipes to use for outlier detection then sse the Outlier Detection On/Off toggle to set if Outlier detection should be performed. | If the preprocessing library contains recipes to use for outlier detection then sse the Outlier Detection On/Off toggle to set if Outlier detection should be performed. | ||
===Starting a Diviner=== | |||
To start a Diviner run, click on the | To start a Diviner run, click on the '''Start Diviner Run''' button. | ||
[[File:Diviner_Interface_Start_Run_button.png | 500px]] | [[File:Diviner_Interface_Start_Run_button.png | 500px]] | ||
===Review Outliers=== | |||
If outlier detection is turned on then potential outliers will need to be reviewed. Please see this page for more information: [[diviner_review_outliers | reviewing outliers for Diviner]] | |||
===Results=== | |||
During a Diviner run the number of models to be built is based on the number of: | |||
* X block preprocessing recipes | |||
* Y block preprocessing recipes | |||
* Model types | |||
** As of version 9.5, the model types are PLS models (by default) and MLR models (which can be set from the Options window) | |||
* Variable selection methods | |||
** As of version 9.5, the variable selection methods are none and [[Selectvars | Automatic]] | |||
Model refinement may be performed on the better performing of these initial models. | |||
====Model Refinement==== | |||
Model refinement may be performed from the first plot of results to appear during a Diviner run. Use the '''Make Selection''' button to select the models to refine. It is recommended to refine the models that are in the lower left hand portion of the plot, as these models show good performance (low RMSECV) and are not over-fit (low RMSECV/RMSEC ratio). Click the '''Accept and close''' button (the green check) to accept the selection. | |||
<gallery widths=500px heights=500px mode="nolines"> | |||
File: Diviner_Results_Plot.png | |||
File: Diviner_Make_Selection_button.png | |||
</gallery> | |||
Use the '''Model Refinement Options''' window to select how to refine the models: | |||
* Variable selection - perform [[Interval_PLS_(IPLS)_for_Variable_Selection| iPLS variables selection]] on the selected models | |||
* Preprocessing - as of version 9.5 this option is unavailable | |||
* Outlier reinclusion - if potential outliers were removed then reinclude and rebuild the models | |||
[[File: Diviner_Model_Refinement.png | 300px]] | |||
'''Note:''' If you wish to not perform model refinement, then just click the '''Accept and close''' button (the green check) to close the plot with no selection and the Diviner run will end. | |||
====Review Results==== | ====Review Results==== | ||
When the Diviner run has completed then the results plot will automatically appear. Here is an example of a results plot showing the '''RMSECV/RMSEC vs RMSECV''' for all the models calculated during the Diviner run. The legend is showing the models plotted by Number of Latent Variables. To review the results, change the class set shown on the results plot to identify any trends. See this page for more information: [[Diviner_review_results | diviner results]] | |||
<gallery widths=500px heights=500px mode="nolines"> | |||
File: Diviner_Results_Plot.png | |||
File: Diviner_Results_Class_Sets.png | |||
</gallery> | |||
===Diviner Buttons=== | |||
=====Toolbar Buttons===== | |||
[[File: Diviner_Interface_just_top_buttons.png | 500 px]] | |||
# Start Diviner - start a Diviner run. Becomes enabled once calibration data has been loaded and preprocessing recipes set. | |||
# Send to PCA - quickly send data to PCA Analysis window to allow building a PCA model | |||
# Options - open the Diviner options interface | |||
# Save Results - save the results from a Diviner run. Becomes enabled after a Diviner run has completed. | |||
# Load Results - load results from a Diviner run. Will clear any current results and data. | |||
# Open Browser - open the Workspace Browser window | |||
# Help - open Diviner documentation | |||
=====Output Buttons===== | |||
[[File: Diviner_Output_Section_Buttons.png | 400 px]] | |||
This | # Variable Consensus - open the [[Diviner_review_results#Variable_Consensus_Plot | variable consensus plot]] | ||
# Results plot - open the [[Diviner_review_results#Results_Plot| results plot and preprocessing lookup table]] | |||
# Results table - open the [[Diviner_review_results#Results_Table | results table]] | |||
# Outlier plot - open the [[Diviner_review_outliers | outlier plot]]. This button will only be enabled if outlier detection was turned on. | |||
Latest revision as of 06:36, 3 April 2025
Diviner Analysis Window
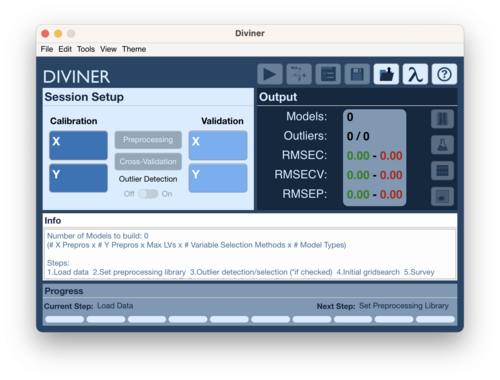
The Diviner Analysis window serves as the main interface to perform a diviner run.
Using the Diviner Analysis window
Loading Data
There are several methods to load data into the Diviner analysis window. As of version 9.5 the Diviner analysis window does not allow importing data directly from a spreadsheet or other file format. This must be done before hand and the resulting DataSet Object must be present in the Workspace Browser. Please see this wiki page for importing data into: Importing Data and this webinar: Importing Data Webinar
To Load Data
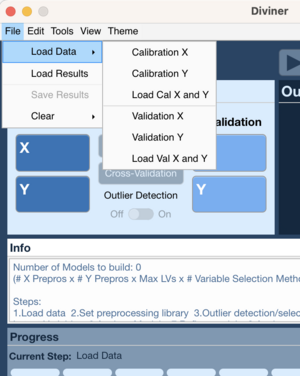
File Menu 1
- Go to File → Load Data → Calibration X (or Validation X)
- Choose data to load for X block
- Go to File → Load Data → Calibration Y (or Validation Y)
- Choose data to load for Y block
File Menu 2
- Go to File → Load Data → Cal X and Y (or Val X and Y)
- Choose data for X block
- Choose data for Y block
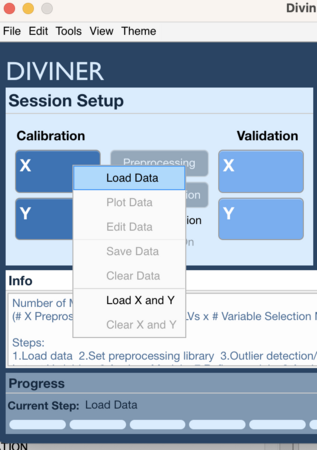
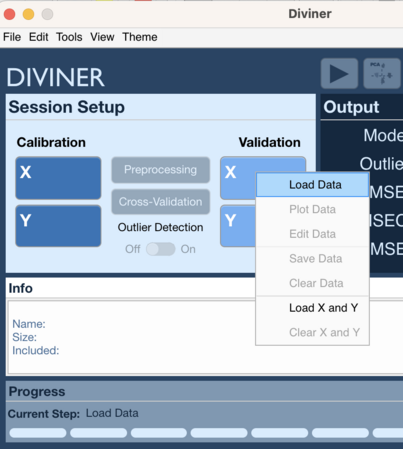
Context Menu 1
- Right click on Calibration X block (or Validation X block)
- Select Load Data
- Choose data to load for X block
- Right click on Calibration Y block (or Validation Y block)
- Select Load Data
- Choose data to load for Y block
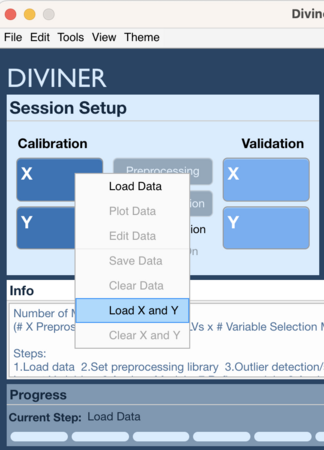
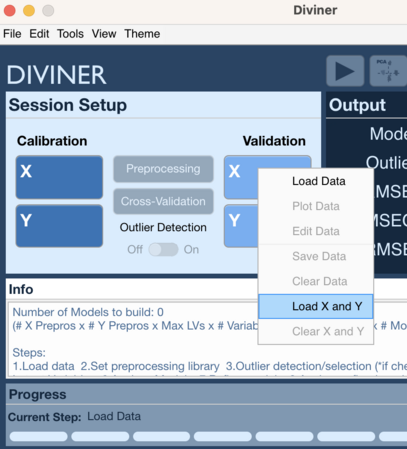
Context Menu 2
- Right click on Calibration X block or Calibration Y block (or Validation X block or Validation Y block)
- Select Load X and Y
- Choose data to load for X block
- Choose data to load for Y block
Validation Data
Important Note: It is recommended to load validation data, if available, before performing a Diviner run. Doing so will apply all the models to the validation data and report RMSEP values in the Diviner results. If validation data is loaded afterwards then the Diviner run will need to be recalculated to apply the models to the test data.
Select Calibration Y Column
If the Calibration Y block is multivariate then a single Y variable must be selected for modeling:
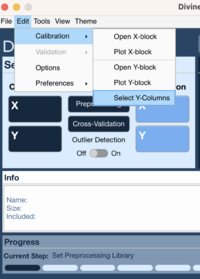
Method One
- Go to Edit → Calibration → Select Y-Column
- Select Y variable to use for modeling
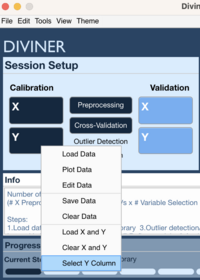
Method Two
- Right click on Calibration Y block
- Choose Select Y Column
- Select Y variable to use for modeling
Set Preprocessing Recipes
Once data has been loaded, the next step is to set the Preprocessing recipes to be used by Diviner to build the models. Click on the Preprocessing button to open the Diviner Preprocessing window. Please see this page for more information about the Diviner Preprocessing interface: diviner preprocessing interface. The collection of recipes will be referred to as a library.
Cross-Validation
Review and modify the cross-validation settings using the Cross-Validation button. Please this page for more information on using cross-validation: cross-validation. The default is set to Venetian Blinds with 5 splits.
Outlier Detection
If the preprocessing library contains recipes to use for outlier detection then sse the Outlier Detection On/Off toggle to set if Outlier detection should be performed.
Starting a Diviner
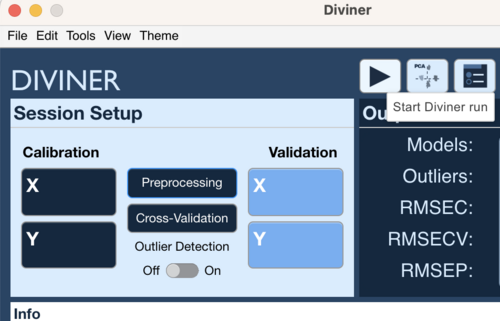
To start a Diviner run, click on the Start Diviner Run button.
Review Outliers
If outlier detection is turned on then potential outliers will need to be reviewed. Please see this page for more information: reviewing outliers for Diviner
Results
During a Diviner run the number of models to be built is based on the number of:
- X block preprocessing recipes
- Y block preprocessing recipes
- Model types
- As of version 9.5, the model types are PLS models (by default) and MLR models (which can be set from the Options window)
- Variable selection methods
- As of version 9.5, the variable selection methods are none and Automatic
Model refinement may be performed on the better performing of these initial models.
Model Refinement
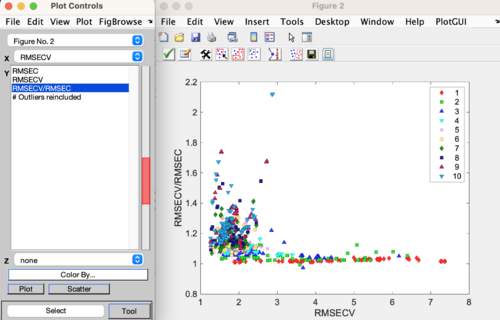
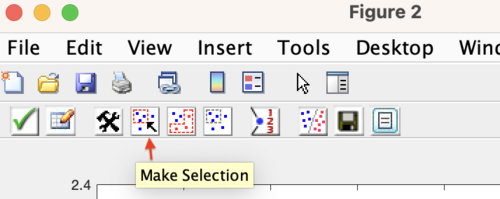
Model refinement may be performed from the first plot of results to appear during a Diviner run. Use the Make Selection button to select the models to refine. It is recommended to refine the models that are in the lower left hand portion of the plot, as these models show good performance (low RMSECV) and are not over-fit (low RMSECV/RMSEC ratio). Click the Accept and close button (the green check) to accept the selection.
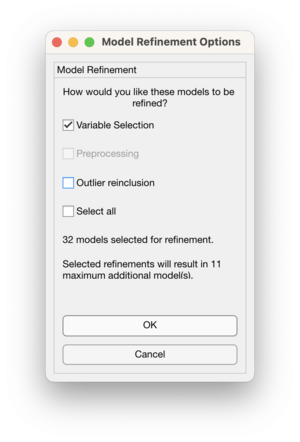
Use the Model Refinement Options window to select how to refine the models:
- Variable selection - perform iPLS variables selection on the selected models
- Preprocessing - as of version 9.5 this option is unavailable
- Outlier reinclusion - if potential outliers were removed then reinclude and rebuild the models
Note: If you wish to not perform model refinement, then just click the Accept and close button (the green check) to close the plot with no selection and the Diviner run will end.
Review Results
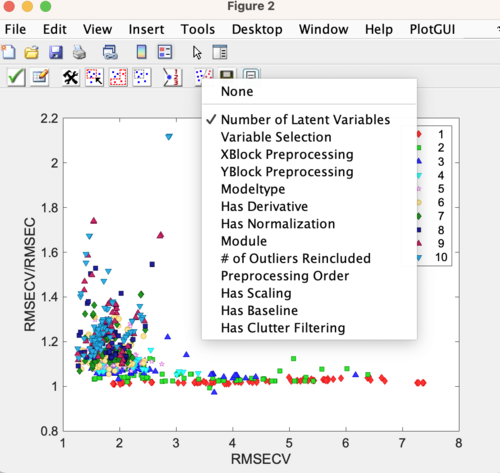
When the Diviner run has completed then the results plot will automatically appear. Here is an example of a results plot showing the RMSECV/RMSEC vs RMSECV for all the models calculated during the Diviner run. The legend is showing the models plotted by Number of Latent Variables. To review the results, change the class set shown on the results plot to identify any trends. See this page for more information: diviner results
Diviner Buttons
Toolbar Buttons
- Start Diviner - start a Diviner run. Becomes enabled once calibration data has been loaded and preprocessing recipes set.
- Send to PCA - quickly send data to PCA Analysis window to allow building a PCA model
- Options - open the Diviner options interface
- Save Results - save the results from a Diviner run. Becomes enabled after a Diviner run has completed.
- Load Results - load results from a Diviner run. Will clear any current results and data.
- Open Browser - open the Workspace Browser window
- Help - open Diviner documentation
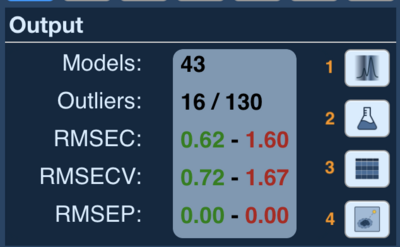
Output Buttons
- Variable Consensus - open the variable consensus plot
- Results plot - open the results plot and preprocessing lookup table
- Results table - open the results table
- Outlier plot - open the outlier plot. This button will only be enabled if outlier detection was turned on.
